Help Center
Website Integration and API
For Ready to Wear
We handle onboarding end-to-end for ready-to-wear brands looking to add visual size prediction to their product pages. We pull sizing data directly from your e-commerce platform (e.g. Shopify, BigCommerce, Salesforce, Magento), calibrate our fit prediction model to your brand, and install the experience on your product pages with no engineering lift required. Running a custom storefront? Drop in one div and one script tag (or wrap our React component near your size selector) and you're done. Most brands go live in days, not quarters.
Book a demo with us to get started.
For Made to Measure
For brands looking to collect measurements from their customers remotely, adding our measurement widget to your site is simple, and will take less than 5 minutes.
First, make sure you have created a TrueToForm account and are subscribed to the Pro plan. You will need to provide us with the domain of your website so that we can whitelist the use of the widget on your site. Email us at hello@truetoform.fit with this information to obtain your unique API key.
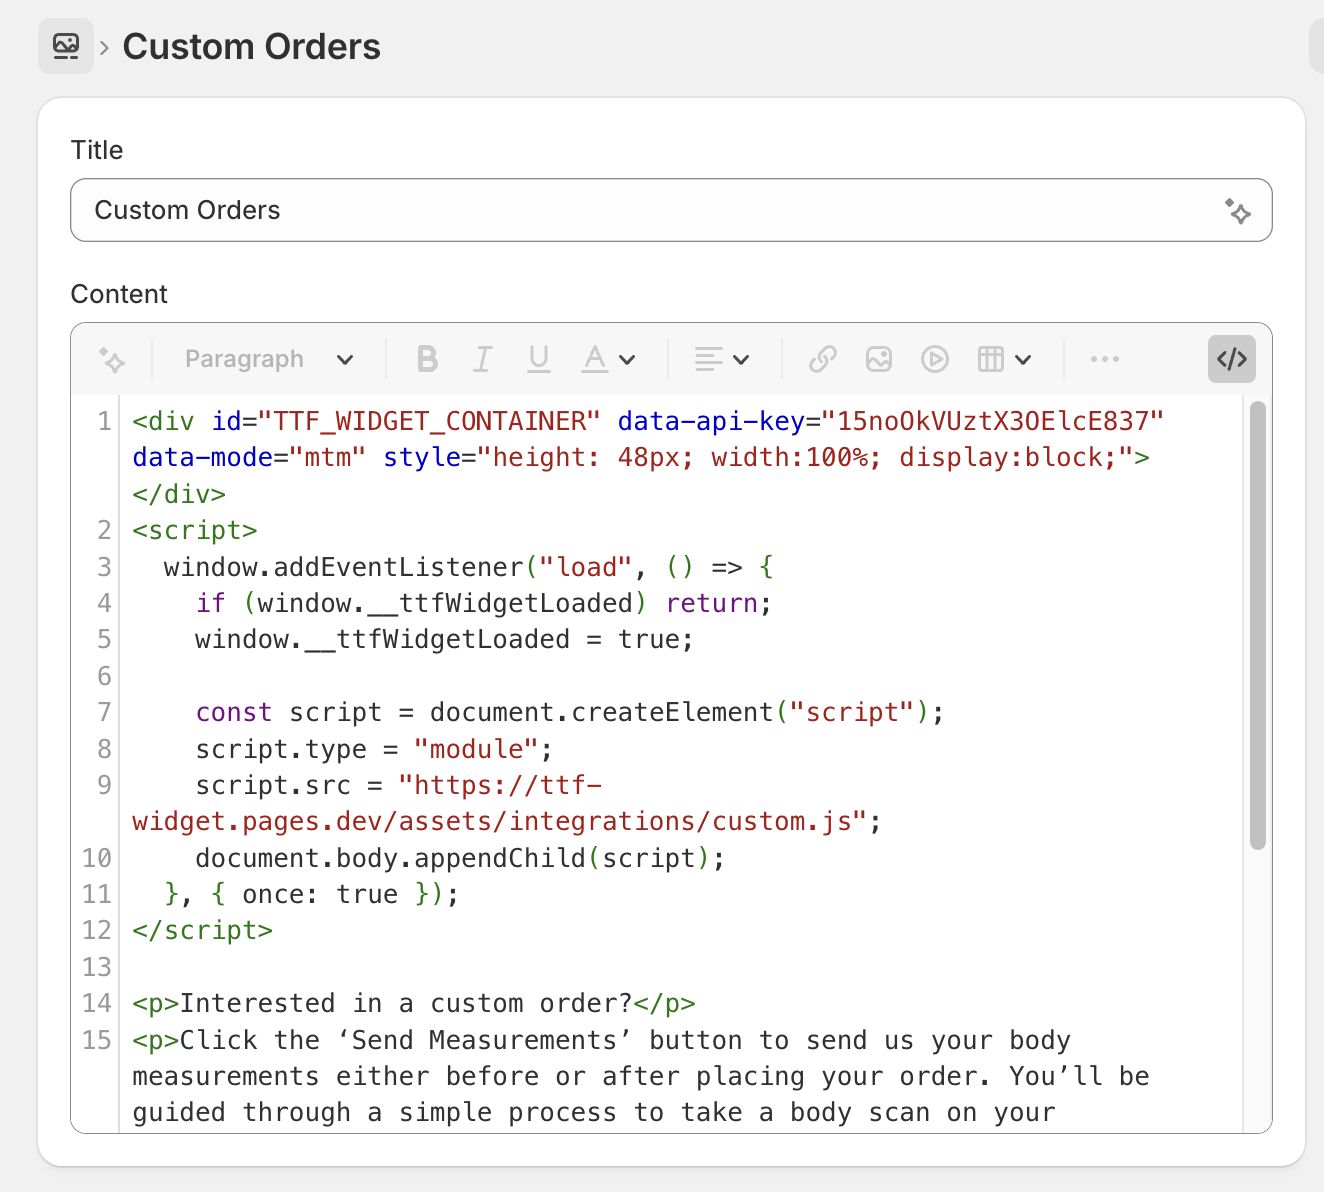
Next, copy this snippet of code and fill in your API Key. Make sure to keep the quotations ("") around each value in the code but remove the brackets (<>). This will be the code that will load the widget onto your website page.
<div id="TTF_WIDGET_CONTAINER" data-api-key="<api-key>" data-mode="mtm" style="height: 48px; width:100%; display:block;"></div>
<script>
  window.addEventListener("load", () => {
    if (window.__ttfWidgetLoaded) return;
    window.__ttfWidgetLoaded = true;

    const script = document.createElement("script");
    script.type = "module";
    script.src = "https://ttf-widget.pages.dev/assets/integrations/custom.js";
    document.body.appendChild(script);
  }, { once: true });
</script>
Check out our Demo Store
You can embed the measurement widget anywhere you'd like on your site, such as on your product pages, or on a "Custom Orders" landing page where you can direct your customers before or after completing a purchase.
Check out our Shopify Demo Store (password: truetoform.demo) to see an example with some sample website copy.
Adding the Widget to a Shopify Page
Note: If you use another website builder (Wordpress, WooCommerce, Wix, etc.), the steps for integration are very similar! If you have any questions, reach out to us at hello@truetoform.fit so we can help.
To add our widget to a page on your store, from the Shopify admin console:
Click on “Online Store” on the left hand menu.
Navigate to “Pages” and pick the page you want to add the widget to.
In the box that has the contents of your page, click on the button on the top right to show HTML. The button looks like this: <>.
Copy the snippet of code above (with your API Key filled in) into the HTML block.
Click the <> button again to switch back to HTML mode. The widget will not appear in the preview. To test it, publish the page and view it on the live site using a whitelisted domain.
You can change the horizontal alignment of the button if you want by highlighting the entire button and using the Alignment button at the top to shift its alignment.
Adding the Widget to a Product Description
To add our widget to the description of a specific product, again start from the Shopify admin console:
Click on “Products” on the left hand menu near the top.
Click on the product you want to add the widget to.
Steps 3-6 are the same as above for adding the widget to a page.
Adding the Widget to a Shopify Theme
If you would like to add the measurement widget to many products at once, follow the instructions below to modify your Shopify theme:
Go to admin.shopify.com and go to Sales channels -> Online Store -> Themes -> Customize (next to the theme listed)

Click on the “Home page” dropdown located at the top center of your screen and go to Products -> Create template. Create a template “Based on” your default product template (this will copy everything over from your default product template page).

Click Add Block -> Custom Liquid wherever you would like the “Send Measurements” widget to be placed on your site.

Copy and paste the TrueToForm widget code into the “Custom liquid” section on the right sidebar and save the modified template.

Go to the product page for any products where you would like the measurement widget button to be displayed, and change the Theme template to the name of the new template you created in Step 2.

To add the measurement widget to all of your product pages instead of a few, change the “Default product” template instead, and the measurement widget button will show up on all pages where this template is applied. You can see how many products a template is currently applied to on the Products drop-down in the Online Store theme editor.
API Documentation
The TrueToForm API may be used to programmatically access any of the following information for a scan that has been shared to your account:
1. Measurement values for a specified list of measurements
2. Download link to the avatar OBJ file
3. Demographic data associated with the scan
4. Date on which the scan was taken
You may access our API documentation below:
TrueToForm REST API
TrueToForm Webhook
TrueToForm Headless Session API
Contact us at hello@truetoform.fit to request your API key and Access Token.
Read our guide on how to integrate TrueToForm into your post-purchase order confirmation page, email, and SMS here.
If you don’t have development resources on your end, you’re also welcome to use our development team to support the integration. If you'd like to go that route, contact us at hello@truetoform.fit and we can set up a technical call to learn more about your desired workflow and scope out the implementation.
Navigating the Measurement Dashboard
Sign Up and Add a Plan
On your desktop/laptop, create or log into your dashboard account at app.truetoform.fit. This is where you'll be able to see and manage avatars that have been shared with your account.
Once logged in, you will get access to 5 free avatars with basic measurements including bust, waist, hips, and inseam. This means that you can approve up to 5 scans that have been shared to your dashboard (approve them on your Pending Avatars page). Avatars that are shared with your account, but that are not approved by you, will not count toward your usage.
Adding a paid plan will allow you to approve more avatars, view 60+ measurements for each avatar, and export measurement and .obj files. When you are ready to add a paid plan, you can do so from your Account Page of your dashboard (click profile icon on top right), or from the measurements viewer for an avatar that has been shared with you.
Send Avatar Request Email
To send an avatar request email to your client, click on the ‘Send Avatar Request’ button in your dashboard. Enter your client’s name and email, then submit your request. Your client will receive an email (view sample email PDF) containing your unique QR code and instructions for submitting their avatar via the TrueToForm app. The scan can be completed directly from the internet browser of their smartphone or tablet at web.truetoform.fit, no app download required. Your request will appear on the ‘Sent Requests’ page of your dashboard.
Send Avatar Request Link
You can also share a direct link with your customer using your unique web app URL: web.truetoform.fit/send-avatar?clientId=XXXXXX
Just replace the XXXXXX with your 6-digit share code, which you can find in the top left corner of your measurement dashboard.
This direct link will automatically share your customer’s scan with your account, making it easy to send requests through messaging apps like WhatsApp or via text.
Preview & Accept Avatar
Once your client submits their avatar, it will appear on your ‘Pending Avatars’ Page. Click the ‘Preview’ button to view the avatar. Make sure the avatar and entered inputs (height, weight, gender, age) look correct. If you approve the avatar, its measurement data will become available to you on the 'Avatars' page.
Overview of the Pro Plan
You can upgrade your plan in two places. The first option is to click on the profile icon in the upper right of your dashboard. Navigate to your ‘Account’ Page and click to upgrade in the plan section. Select the ‘Choose Pro’ button to upgrade.
You can also upgrade your plan if you are on the ‘View Avatar’ Page. View the measurements panel on the right side and navigate to the 'Full Measurement’ row. Click on the ‘Start Plan to View’ link. From here, select the ‘Choose Pro’ button to upgrade your plan.
Using the TrueToForm Mobile App
How to Scan
Download the TrueToForm iOS app from the App Store or launch the TrueToForm web app directly from your browser using a smartphone or tablet at web.truetoform.fit (no app install required).
You can log into your account if you’d like to save your avatar, or proceed as a guest. Click “+ New Avatar” to start the scanning process.
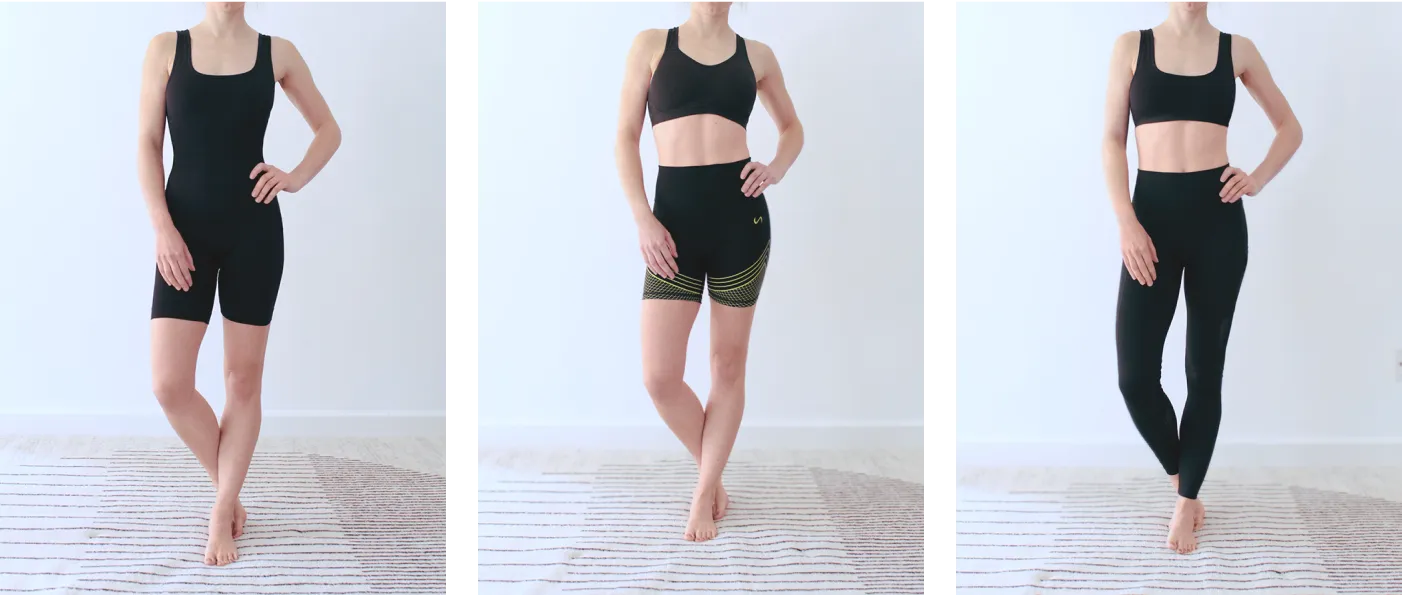
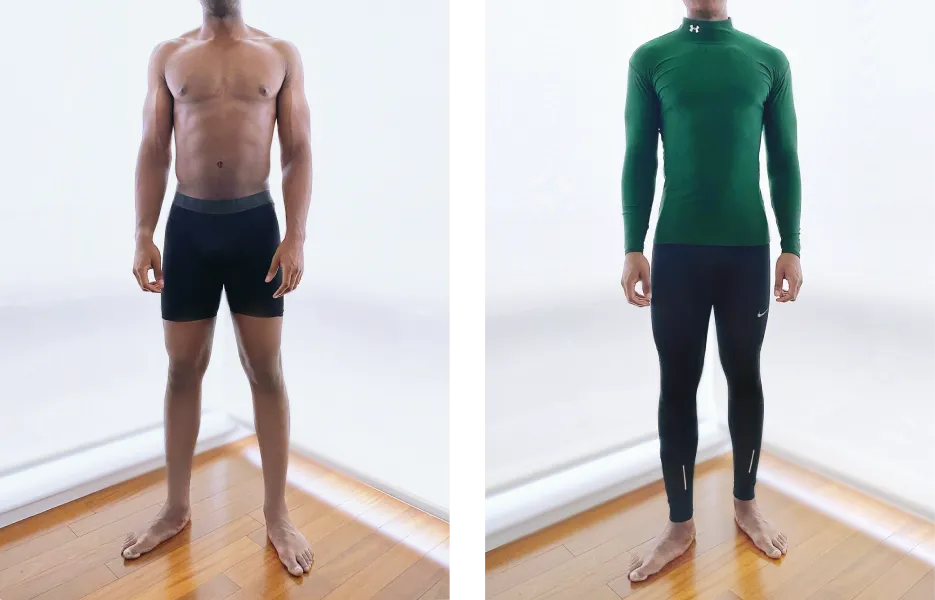
If using the web app, you will be guided through a single rotational scan with your phone placed at floor level. Rotate in place in front of the front-facing camera once over the course of ten seconds, with your arms up in cactus pose. If using the iOS scan app, you will be guided through an additional scan of the torso at close proximity, with your phone placed at hip level.
If the scan was done properly, your avatar will take about 2 minutes to process on the web app (2-10 minutes on the iOS app) and will then be automatically available to view on your device. If something went wrong with the scan (e.g. loose clothing or obstructions in the scan area), an email notification will be sent to let you know what went wrong and prompt you to take a new scan.
Adding Avatar Info for a New Scan
After both scans are completed, scroll down to the “Avatar info” section on the New Avatar page in the mobile app. If you are logged in, use the toggle to indicate whether this is a scan of yourself. If so, you can edit and save your presets for gender, height, age, and weight. Make sure to save your changes after editing.
If you are scanning someone else, switch the toggle off and add the appropriate inputs for gender, height, age, and weight for the person you are scanning.
You can also edit your presets by going to your settings. Click on the edit button on the “Avatar Generation Presets" row. Make the necessary edits to your presets. Remember to save your changes after making any edits to your presets.
Sharing Avatar to Your Dashboard
Scroll down to the final section of the New Avatar page in the mobile app titled “Share”. If you’d like to view your measurements on your own dashboard, select “Send to my dashboard”. Selecting this option will make your avatar available on your measurement dashboard, which you can access at app.truetoform.fit by logging in with your TrueToForm credentials (the same credentials you used for the mobile app). Make sure to use a desktop or laptop when using your measurement dashboard for the best viewing experience.
Sharing Avatar With Share Code
If you would like to share your measurements with another user, select “Share” and enter the user’s 6-digit share code (on the New Avatar page in the mobile app). You will need to get the 6-digit share code from the user directly, who will need their own TrueToForm account. The user can find their 6-digit share code in the top left corner of their measurement dashboard at app.truetoform.fit, or in the Settings menu of their mobile app when they are logged in. The user has the option to share their 6-digit code directly with you via email by clicking the ‘Send Avatar Request’ button.
Sharing Avatar After Creation
You can also select “Don’t share right now” (on the New Avatar page in the mobile app). You will have the option to share the avatar from the mobile app after it has been created.
If you’ve already created an avatar and would like to share it, select the avatar in your mobile app and click “Share”. Click “Send to my dashboard” if you’d like to view it in your own measurement dashboard, or enter the 6-digit share code of the user you’d like to share it with.
Tips for Taking a Successful TrueToForm Scan
Clear the Area Around You
Clear the area directly in front of your device as well as the area behind you. Anything between you and your camera, or large amounts of background clutter may prevent accurate scan tracking.
Make Sure You Have Good Lighting
Stand in a well-lit area with good lighting. Scan reliability can be negatively affected by low lighting conditions or very bright overhead lighting that can wash out scan images.
Rotate in Place and Take Small Steps
Take small steps to ensure that you stay in one spot while rotating.
Look Straight Ahead During the Scan
Make sure to look straight ahead during the scan. Don’t bend over to the side or look back toward the camera while rotating.
Wear Tight-Fitting Clothing
Loose-fitting clothes will shift or bunch up during the scanning process and may impede scan capture and prevent successful processing. Make sure to wear tight-fitting clothes that don't deform the natural shape of your body.
Tie Long Hair Up
Make sure to tie any long hair up above the nape of your neck before scanning.
Use a Compatible Device to Scan
The TrueToForm web app is compatible with any smart device, such as a smartphone or tablet, that has an accelerometer. The web app can be launched directly from your web browser at web.truetoform.fit with no app installation required. The TrueToForm iOS app is also available for download on the App Store for iPhones and iPads with Face ID.
Measurements Included in Your Plan
TrueToForm captures 60+ body measurements, each taken from a consistent location on the 3D avatar and clearly defined for accuracy and repeatability. You can download the full measurement reference guide below.
Download Measurement Reference Guide →
Looking for something more specific? We also support custom measurements. Feel free to reach out to us at hello@truetoform.fit to discuss your requirements.
Importing TrueToForm Avatars into CLO
Convert your TrueToForm avatar into a rigged, size-editable, and/or skinned CLO avatar by following the steps below.
Import TrueToForm Avatar
Go to File → Import (Add) → OBJ. Choose the TTF avatar .obj file. Click “Reset” to return to default import settings and then set the Scale and Unit settings to meters (m).
Re-Center Avatar
Right click on the avatar. Click Move Avatar → To Ground. Then click Move Avatar → To Center.
Export Avatar
Export this avatar as an .obj file and click “Reset” to return to default export settings. Make sure that the File setting is set at “Save with Absolute Texture Image File Path” before exporting.
Autoconvert the New .obj File
- Delete the avatar from CLO. Then click Avatar → Auto convert to Avatar, and choose the new .obj file.
- Make sure to choose the gender of the avatar, keep the converting option to Automatic, check the output boxes you’d like, and choose a destination for this new .avt file.
- Click Convert. When conversion is complete, you will see an avatar for each output you’ve selected.*
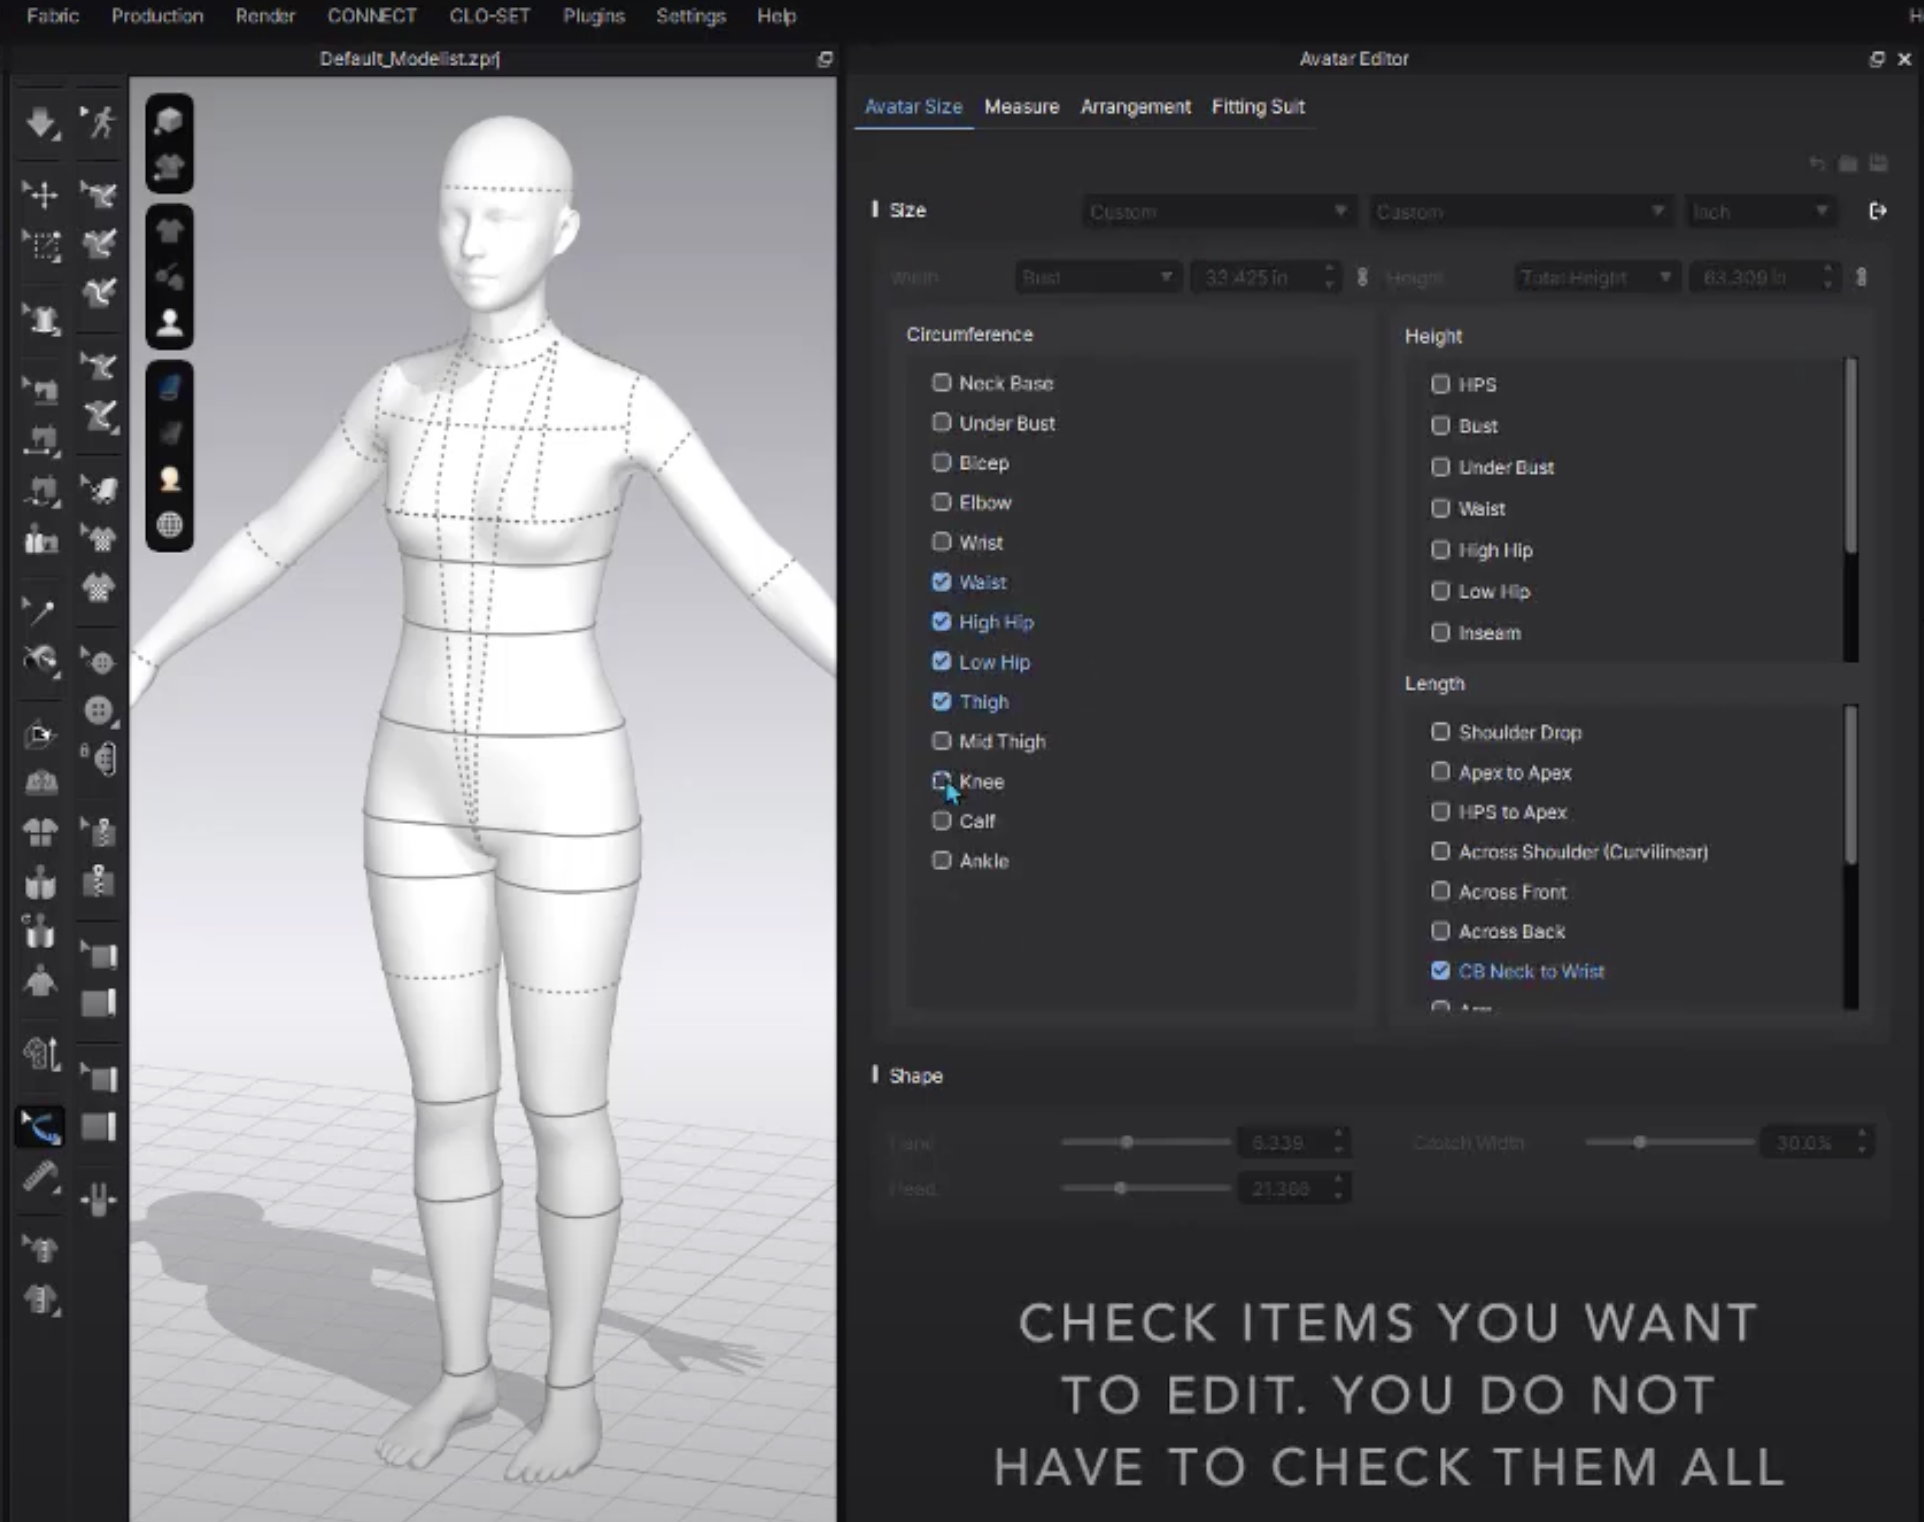
How to Edit Measurements of a Size-Editable Avatar
Click on the Settings gear on the top right corner of the "Avatar Editor" and select the measurements you'd like to edit.

How to Edit Avatar Measurements While Also Adding a CLO Skin
First, autoconvert your .obj file to a “Size Editable” .avt file following the steps above. Use the “Avatar Editor” to change the measurements of your avatar as you’d like. Then, export the updated avatar as an FBX file, and autoconvert the new FBX avatar into a “CLO Skin Style” .avt file.
*Some rigging points may be slightly off. Check out the “Automatic Rigging & Converter (ver 6.0)” article on the CLO 3D website for more info on rigging points more accurately.
Importing TrueToForm Avatars into Browzwear
You will NOT be able to adjust an imported avatar in VStitcher. Measurements, poses and skin tone should be edited in the third-party software the avatar is created in.
Auto-Rig Your Avatar with Mixamo
A great, free resource for auto-rigging your scanned avatar for use in Browzwear is Adobe platform ‘Mixamo’.
Export your avatar from the TTF dashboard as an OBJ file and head to Mixamo.
Click ‘Upload a character’ and select the file from your computer. Once the upload is complete, follow the instructions and place markers on the points of the avatar as indicated.

When ready, click ‘Next’ and the auto-rigging process will begin. When you are happy with the results, Click ‘Next’ again to download.

Importing Your Rigged Avatar Into Browzwear
Open up your Browzwear window and import your FXB file downloaded from Mixamo. Your avatar will appear on the screen with a series of floating anchor points.

Each point needs to be anchored to the correct joint/point on the Avatar as indicated on the ‘Edit Avatar’ menu.
Working from the top down, click each red point and then hold ‘control’ while clicking on the corresponding point on the body. The dot will turn green once placed.

Once complete, you will be able to adjust the pose using the gizmo tool.

Using TrueToForm with Vetigraph
Using TrueToForm with Vetigraph 3D Solutions
Open the TrueToForm app, create your avatar in the "Avatar Info" section, and start the scanning process by following on-screen instructions.
Allow about 10 minutes for avatar creation, then share it to the TrueToForm dashboard to view and explore measurements.
Use the dashboard's QR code for further scanning purposes.
You can import TrueToForm avatars as an OBJ file and assemble garments directly on your avatar in Vetigraph’s expert 3D solution.
For more information on how to use the TrueToForm app, click here.

Using TrueToForm for Vetigraph Made-To-Measure
Open Vetigraph and create a Column in the size table for each measurement needed.

Input your Grading rule in the size table.

Add the ideal body measurements for your base size.

Start to grade your style with the Formulas.

Use the TrueToForm measurement dashboard to easily pull the measurements you need for Vetigraph. For your convenience, you can also export the measurements as a .csv file to make importing them simpler.

Enter the avatar measurements into the MTM row of the Vetigraph size table.

The Made to Measure pattern is finished; you can check your measurements by selecting the pattern components to check the composite measurement for multiple pieces.

The ease from your base pattern will automatically follow the Made To Measure pattern. Deselect the graded sizes to view your made to measure pattern. Watch the full tutorial here,

Using TrueToForm Measurements In GRAFIS
Bring custom measurements into GRAFIS to streamline made-to-measure production.
Open GRAFIS and select your measurement system.

Go to Extras in the top menu bar and click “Edit Measurement Charts.”

Select "New."

Select "single individual measurement chart."

Type in measurement values from your TrueToForm avatar in the Individual column (automated import coming soon!).

Click the "BestFit Settings" gear icon on the right to select the measurements you want to determine the closest standard size. The values highlighted in green are the ones currently used by BestFit for standard size matching.

In addition to selecting which measurements you want to use for BestFit size match, you can also select which size ranges you want to include in the search.

Scan Data and Privacy
When you complete a body scan, your camera captures images that are encrypted and uploaded to our processing servers to generate your 3D body model. These photos are always deleted after processing completes and never stored, unless you opt in to allow us to use them (see below for how that works). Only privacy-preserving silhouette and depth data are collected and stored in order to generate an accurate 3D body model. We don't use facial recognition, and no biometric face analysis is performed at any point. The 3D body model we generate is fully anonymized and does not capture facial features.
Every user maintains full control over who they choose to share their avatar with. Only those that you've chosen to share your avatar with will have access to your avatar and its associated body measurements. The avatar output that is shared and viewed is a fully anonymized 3D body model that does not capture facial features. If you opt in to allow us to use your scan photos (see below), those photos - which show your face and body - may also be shared with the people you share your avatar with. See below for an example of the avatar format that would be viewable to an account once shared:
Avatar OBJ sample | Measurements CSV sample
Optional: allowing TrueToForm to use your photos
Before submitting a scan, you can choose to let us use your scan photos. This is fully optional and turned off by default. If you opt in, we keep a copy of your scan photos and use them to improve scan accuracy for future users, and to troubleshoot issues with your individual scan if you reach out for help. Your photos may also be shared with people you choose to share your avatar with, such as a tailor or other partner, to help improve the fit of your garment. Unlike your avatar, which is fully anonymized and does not show facial features, your scan photos show your face and body. We never sell or publish your photos, and we never share them with anyone other than the people you choose to share your avatar with.You can revoke permission or request deletion of your photos at any time by contacting us at hello@truetoform.fit. Keep in mind that once your photos have been shared with someone, we cannot guarantee they will delete their copy.
All data is encrypted during transfer and storage.
We take your privacy very seriously. For more details regarding how we protect your information, see our Privacy Policy.


